How to Create ExplainerGIFS

A FREE self-paced guide to creating animated GIFs that explain your ideas quickly.
Using common tools like PowerPoint and Screencasting, we'll show you exactly how to create and share useful animated GIFs.
This guide is a sample of our online courses at the Explainer Academy.
Share the Love...


Start Here
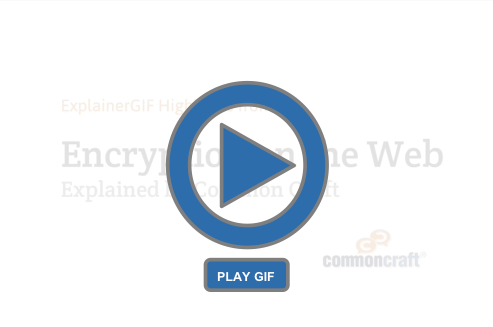
This guide provides step-by-step instructions for creating do-it-yourself animated GIFs. Click "play" below for an example:

Wait, what is this, again?
The purpose of this guide is to show you how to design and create an animated GIF that explains an idea. It will teach you about the strengths and weaknesses of the GIF format and how to maximize it for your goals.
Who is this for?
The guide is designed for communicators and educators who need better ways to get their message to their audience.
This guide is not focused on designers and does not rely on expensive tools like Photoshop (you can learn that process here or here). The goal of this guide is creating useful, educational animated GIFs using common tools.
I'm ready to get started creating GIFs. Can I skip to that section?
Of course. The sections labeled "Skill:" contain the specific tools and processes. The first skill focuses on finding or creating visuals. Go there now. The "Background" sections are designed to help you understand the GIF format, its strengths and weaknesses and how GIFs have evolved.
What tools do I need to create an ExplainerGIF?
We've worked to make this DIY process as accessible as possible by using common and relatively inexpensive tools. The tools we recommend are:
- Presentation Software (PowerPoint, Keynote) - For designing and creating animations.
- Screencasting (Camtasia, Screenflow, etc.) - For capturing video of animations
- Video-to-GIF Converter - For creating animated GIFs from video clips
Please note that the guide provides links and descriptions to a wide variety of free and paid tools that could work for you.
Why would I want to create an ExplainerGIF?
Animated GIFs are a standard part of the Web and often used for entertainment. This version, the ExplainerGIF, is focused on communicating ideas. This guide exists for two big reasons:
- Increased Shareability - Unlike online video, GIF animations play everywhere, including email. No plug-ins or embed codes are required. They just work.
- New DIY Production Tools - We now have easy access to tools for creating our own GIFs.
Are you selling something? Is this an ad?
This guide is a free service of Common Craft and contains information about our Cut-outs, which are useful in creating ExplainerGIFs. The guide also serves as a preview for our Explainer Academy, which is currently in development. We are not affiliates for any of the products we recommend in the guide and no company has influenced our recommendations. There is no paid third-party advertising.
How long does this take?
You can consume the content in the guide in less than 30 minutes. Once you've learned the basics, you should be able to create an original ExplainerGIF in 15 minutes, depending on your design.
How do you pronounce "GIF"
This is a touchy subject. We say GIF like "Gift". Other's say GIF like "jif" the peanut butter. Please don't judge us.
A Note on the "Play GIF" Button
This guide includes a number of animated GIFs and you'll see them take two forms.
1. Constant Looping - This is the standard format for animated GIFs. They play over-and-over. This constant looping can be distracting but can be really useful, too. Here's an example:

2. GIF Player - Instead of the constant looping, we've added a blue play button that gives you control of when the GIF starts.
One click starts the animation, a second click stops it. Try it!
Please note that the guide does not cover how to publish animated GIFs with a play button. That requires technical know-how that is unique to your usage and beyond the scope of the guide.
Let's Get Started! Our first step is learning more about animated GIFs.
Background: What is an Animated GIF?
The animated GIF is a strange animal.
At heart, an animated GIF is a digital image just like any other image you see online. But it's also a lot like a video, with movement and flow. Animated GIFs look like videos, but behave like images. Perhaps they are the platypuses of the digital world (but prettier). By unpacking how they actually work, you'll see that their power is easy to understand.
A Quick Bit of History (and a boring acronym)
G.I.F. stands for Graphic Interchange Format and was invented by the Compuserve Corporation in 1987. A team at Compuserve tweaked the format to allow for individual GIF images to be combined into an animation - an animated GIF. Then, in the 1990's Netscape created a way for animated GIFs to play in a loop on web pages. These early web pages, runnning on slow connections, could display something with movement and interest. That was the beginning of the first golden age of animated GIFs.
Here's a GIF that sums up the format:
Perhaps the easiest way to understand animated GIFs is to think of them like a modern version of a flip book:

But there's a lot more to animated GIFs. Next let's find out why they are so useful and popular...
This guide is brought to you by the Explainer Academy
Develop powerful explanation skills and learn to create Common Craft Style videos via online courses. Learn more.
Background: The Power and Limits of Animated GIFs
The Power: Sharability
It's easy to take digital photos for granted. They're easy to take and easy to share. All it takes is the click of an "upload" button and your image can appear on websites, social networks, in email newsletters, on mobile phone, etc. Digital images just work.
An Animated GIF is a Digital Image, Too.
An animated GIF is like a video that works everywhere. But you don't have to worry about players or plug-ins or device compatability. It's simple. An animated GIF works almost anywhere an image can be shared online - and that's truly powerful.
The Limits: File Size
Animated GIFs have limits. Because most GIFs are shared online, it's important that they play nicely with web pages and email newsletters. Like a photo or video, animated GIFs work best when they have a small file size. If the file size is too big, the page won't load quickly. The file size constraint is perhaps the most important technical consideration regarding animated GIFs.
To ensure an optimal file size, we have to consider the limits of the format. Here are a few general rules of thumb (we'll focus on these more later):
- Duration - 30 seconds is about the maximum
- File Size - Under 250kbs is a good target
- Color - A few, simple, flat colors are best.
- Dimensions - Small dimensions = fewer pixels = smaller file size
These constraints may seem, well, constraining. But really, they give the format a shape, a starting point. When you set out to make an ExplainerGIF, some decisions are already made for you. This allows you to focus on content.
The latter part of this guide will cover multiple ways to reduce file size in the production process.
The Power: Sources
Most animated GIFs we see today are created from existing videos. People find a clip they like and convert it to an animated GIF. For example, services like GIFSoup and GIFYouTube automatically turn YouTube videos into animated GIFs. This has created an explosion in GIFs. Sites like Giphy are becoming the YouTube of animated GIFs.
This explosion happened because new tools made it easy to turn almost any online video clip into a GIFs. I call this the second golden age of animated GIFs.
The Limits: Creating Source Material
Converting an existing video to an animated GIF is the easy part. It's producing the source material that is the real challenge (and opportunity). Up to now, few people have had the know-how and tools to create compelling animations for animated GIFs.
With this guide, we aim to change that. We will show you easy ways to create and capture animations.
This guide is brought to you by the Explainer Academy
Develop powerful explanation skills and learn to create Common Craft Style videos via online courses. Learn more.
Next: Let's take a quick tour of animated GIFs
Examples: Animated GIF History and Technical Limits
As noted previously, animated GIFs can be created from a huge variety of source material. Let's take a quick tour.
The First Golden Age of Animated GIFs
Back in the 90's animated GIFs had a golden era. Website creators wanted to add animation and personality to web pages and animated GIFs fit the bill because, unlike video, they worked over slow connections. Some famous examples from that era:
MC Hammer

Email Me

Under Construction

These are classics. Notice how they work within the constraints we discussed. They are very short animations. The MC Hammer example is 139kbs. The email me example is 4kb. That's tiny!
GIF Art
It's probably no surprise that the GIF format has been used to create art. Because GIFs loop silently, they provide a medium for creating unique, um, experiences.

Hexagon Wave by Dave Whyte at Bees and Bombs

These are great examples of how sophisticated tools and know-how can be used to create remarkable animated GIFs.
Video Clip GIFs
Today, the biggest single source of animated GIFs is video clips. Here, a video is essentially cut into individual images and then those images are combined into an animated GIF. Here's what I mean:
Now that you know the process, let's look at a few GIFs made from video clips...
NOTE: I've included information on file size so can get a feel for how big these very short files can get.
Dog Jumps Too Soon

2.5 seconds – 1.2 mb (24 Frames)
Dog Balancing

5 seconds - 1 mb (67 frames)
Sneaky Puppy

5.5 seconds - 1.9 mbs (59 frames)
The Big Idea:
Today, animated GIFs are known for entertainment. Whether they are beautiful animations or cat video clips, the GIF format offers a way to create and share video-like animations.
Unfortunately, animated GIFs made from video clips are difficult to manage. They must be very short and low resolution to remain small enough to share on the web. Animated GIF art can be difficult to create without the proper tools and know-how.
Thankfully, animated GIFs can be so much more.
Next: Let's consider the useful side of animated GIFs.
Examples: Amazingly Useful Animated GIFs
Hilarious video clips are great, but I think we can do better. Animated GIFs can also solve problems and educate.
Below are a number of animated GIFs that are designed to educate or instruct. Please note the file sizes on these examples.
30 Years of Music Industry Change
This animated GIF is by Digital Music News and captures 30 pie graphs, all animated to show how spending has changed over 30 years.

30 seconds -- 593kbs (31 frames)
How to Create a Strong Password
This GIF by Intel IQ is a good example of an instructional GIF that walks the viewer through an idea via a tight combination or text and visual.

30 seconds – 131 kbs (16 Frames)
How a Sewing Machine Works
This GIF by NickolayS uses looping to show the mechanics of a sewing machine in a way that feel realistic.

3.5 seconds – 165 kbs (18 Frames)
How pi is Calculated
This GIF by John Reid and and Arpad Horvath provides a visual explanation for how pi is calculated.

10 seconds – 139 kbs (44 Frames)
This is where animated GIFs really shine. A few things to note:
These animated GIFs...
- Are useful!
- Relate complex visual information quickly
- Are small, shareable files
The problem: These animated GIFs are sophisticated animations. They are difficult to conceive and produce.
But don't despair. Useful animated GIFs can be EASY to create - and that's what the rest of this guide is all about.
Here's an example I created using PowerPoint animations. It explains the water cycle:

7.5 seconds- 106kbs (83 frames)
Here's a longer one, also created with PowerPoint animations, that was part of the Common Craft Soccer Guide that we created for the World Cup. It provides an overview of the soccer field:
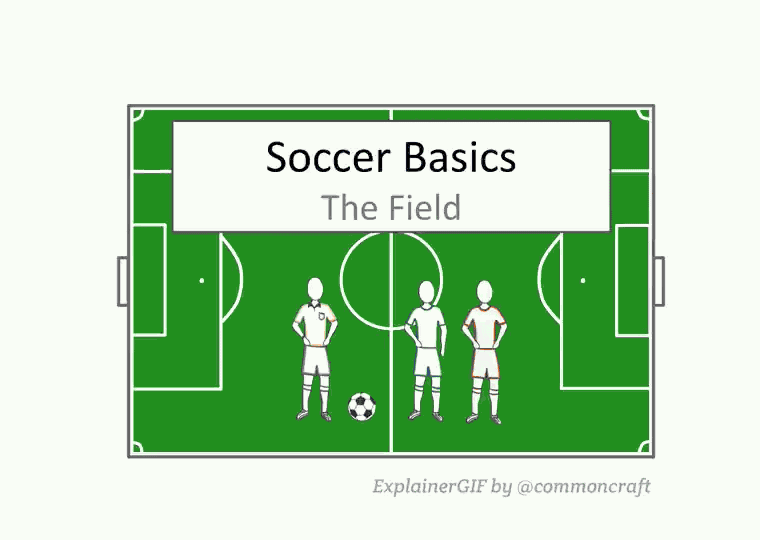
40 seconds - 324 kbs (403 frames)
Now, THIS is the Real Beauty
Take another look at the data on that last animated GIF. It's:
- 40 seconds long!
- 324kbs file size!
That's beautiful. Why? Because it means there is a way to create useful animated GIFs that can be long enough to explain a LOT of ideas. This example is a little bigger than my previous recommendations, but it still works great.
By animating simple images on a white background in PowerPoint, we can create useful, shareable GIFs that explain ideas. These are ExplainerGIFs.
This guide is brought to you by the Explainer Academy
Develop powerful explanation skills and learn to create Common Craft Style videos via online courses. Learn more.
Next: Let's Consider What's Possible with PowerPoint
Examples: Useful GIFs Made with PowerPoint
The chances are, you have feelings about PowerPoint.
You've probably seen it abused with boring presentations that have 15 bullet points per slide, tiny font and no visuals. PowerPoint has become a widely used and often-loathed tool for presentations.
Today, I will ask you to put your feelings aside. PowerPoint (or Keynote) is simply a platform and as we'll see, it can be used for a lot more than quarterly budget reviews. Our focus here is animation and PowerPoint has everything we need for turning your idea into an ExplainerGIF.
The examples below were all created with PowerPoint animations
Bar Graph - Imagine every chart and graph coming together as an animated visual
Landing Page Promo - Imagine using an animation to show product features, use cases, value propositions.
Conversations and Interactions - Imagine a comic book-like experience as an animation

With a little practice, you'll be able to create similar animations with PowerPoint. I also use Common Craft Cut-outs for visuals.
To get you started, I'll focus on a very simple animation: the Venn Diagram. This simple version will allow us to focus on the skills and mechanics of creating animations rather than picking colors and words.
Here's an example that is like the one we'll create together:

↵
Wait. Are these really better than static images?
It's a good question. A well-designed chart or graph can relate a lot of information without being animated. And in a lot of cases, a static image may be the best option. However, I think animated GIFs have inherent strengths that make them useful in a lot of cases.
- Movement attracts attention. A looping animated GIF attract the viewer's attention in a way that a static image cannot.
- When an animation loops, it can provide the viewer a way to digest the information more fully.
- Animations have the ability to pack a lot of visual information into a short, digestible package.
When do animations work best?
There are specific cases where animated GIFs can convey data or information much more effectively than static images. These are:
- When data change over time. Consider a GIF of deforestation of a rainforest.
- When simple becomes more complex. Imagine a GIF that shows individual molecules combining to create an element.
- When multiple steps are required in a process. Examples here include tying a bowtie, or completing an equation.
- Viewing multiple sides of a three-dimensional object. What does it look like from the back? Or the side?
- Analyzing a single object across multiple variables (time, size, color, etc.)
Next: Let's Take a Look at Visuals
Skill: Creating, Drawing or Finding Visuals (with a DISCOUNT)
At heart, an animated GIF is a visual experience. Where will you find visuals?
Sure, you could create an ExplainerGIF with nothing but text and may it be awesome. But probably not. To make GIFs interesting and compelling, you'll need visuals. Thankfully, there are a number of options for finding drawing or adding visuals to your GIFs.
We Can Help
Common Craft offers an online library of over 2000 high resolution visuals in "Common Craft Style" just like the ones you see in this guide. We call them Cut-outs and they are PNG files with transparent backgrounds.
Want to try them out? Click here to download 10 free Cut-outs (.zip)

Common Craft Membership is the best way to access 1000s of Cut-outs. It's annual and starts at $49 a year. That's about $4 a month. FOUR DOLLARS.
Want an additional 15% discount? Use this link to sign up
Paid Options for Downloadable Visuals
- Check out the Noun Project. They have an impressive library of icons that form a kind of visual language.
- You can find huge selections of images on stock photo websites like iStockPhoto and Shutterstock and Getty Images.
Free Options for Downloadable Visuals
If you're not able to purchase the images you want, we recommend using images that are in the public domain, or are licensed for sharing.
- Wikipedia has a big list of sites that offer public domain photos and illustrations.
- Pixabay offers a huge library of photos and illustrations that are free to use.
- WPClipArt is designed for students and offers copyright-free drawings and images.
- Open Clip Art All public domain clip art.
Drawing with Presentation Software
I think people would be surprised at how often I use PowerPoint to create new drawings for our videos. Once you get a few skills down, you can draw a huge number of things with your mouse.
Next, we'll create and animate shapes in PowerPoint
Skill: Animating Visuals In PowerPoint or Keynote
Let's Talk Process
The rest of this guide will show you exactly how to create ExplainerGIFs. There are four key parts to this process:
- Add and animate visuals using presentation software (covered below)
- Record those animations using screencasting
- Edit the video made from screencasting and convert it to a GIF
- Share the GIF
The ExplainerGIF below outlines these steps visually:
PowerPoint and Keynote have flexible tools for animating shapes and images.
As you saw in the previous section, PowerPoint can serve as a great animating tool. Once you get the controls down, the options are endless.
For our first example, we'll start very simply and animate a Venn Diagram. By using on a very short and sweet example, we can focus on the skills and mechanics of animation rather than colors and words.
A few things to note:
- The skills portion of this guide will rely heavily on video screencasts. The videos are a rich source of information and I encourage you to watch them.
- The version of PowerPoint that appears below is PowerPoint 2011 for Mac. It should match the most modern versions of PowerPoint for PC.
- While your animation features may differ across software and versions, including Keynote, the ideas remain very similar.
Here's the video:
As you can see from the example above, animations can be easy to produce in PowerPoint. With some experience, you'll see that images can appear, disappear and move in almost any way you can imagine.
Practice Time
Open a blank slide in PowerPoint with a white background. Draw a few shapes on the slide. Any shapes will do for now - this is just practice.
Open the "Animation" options and experiment. Try these kinds of animations:
Entrance Effects:
- Have the shape "appear"
- Have the shape "fly in"
Exit Effects:
- Have the shape "disappear"
- Have the shape "fly-out"
Note that you can control the speed, direction and order of the animations by using the "Animation Options". Click the "Reorder" button to see a list of every animation on the slide.
Motion Effects:
- Have the shape move from one spot to another in straight line, using the motion "path" options.
- Have the shape move on a curve.
Combine Animation Actions:
- Have a shape appear, move across the slide, then disappear.
- Have a shape move to multiple points on the slide.
Custom Animations: Use the "Custom Animations" tool to experiment with the speed and order.
- Set up multiple animations on a single slide
- Select a shape and use the "with previous" and "after previous" options to control when each animation starts.
- Select a shape and set it to "fly in" at different speeds and from different directions.
- Change the order of the animations
Next: Let's Capture Animations with Screencasting
Skill: Capture PowerPoint Animations with Screencasting
Now that we've created a simple animation in PowerPoint, we need to capture that animation and turn it into an animated GIF. There are a number of ways to do this, but they all have a few things in common:
- We'll use Powerpoint to "play" the animation on the screen
- When the animation plays, we'll record what is on the computer screen using screencasting tools.
- Once recorded, the animation can be edited and manipulated
- When editing is finished, we'll create an animated GIF, or ExplainerGIF
Please note: It is possible to use PowerPoint or Keynote to save a presentation as a video file. This may be an option if you don't have screencasting tools. A couple of considerations:
- While PowerPoint can technically create a video from a presentation (File --> Save As Movie) I don't recommend it. The quality is poor and in my experience, it doesn't work well with animations.
- Keynote creates videos with ease and good quality. However, there is limited control. Use (File --> Export to --> Quicktime) to create the video.
If this is your best option, create a video and go to the next section to convert your video to an animated GIF.
An Introduction to Screencasting
Screencasting is a fundamental part of creating ExplainerGIFs. If you are new to screencasting, the short Common Craft video below will give you important context on what screencasting is and how it is used.
You can see why this is kind of tool is so central to creating Explainer GIFs: screencasting allows us to quickly make a video from anything that happens on our screen.
An Introduction to Screencasting Tools
There is a large variety of screencasting tools, both free and paid. In the sections below, you'll see that I recommend a few options based on my research. Before going to the tools, there are a few things you may consider:
Free vs. Paid Screencasting
There are a number of free screencasting tools available on the Internet and many computers come with screencasting tools built in (more on that below). As with any software, you often get what you pay for. The free tools can almost always accomplish the core feature of capturing the screencast video. However, many free tools have serious limitations. These may include:
- Limited ability to edit the video
- Limited ability to export the video in desired formats
- Limited recording options
- Limited customer support options
- Branding watermarks present in the video
- Poor design and usability
FREE Examples include:
- Jing (Mac and PC)
- QuickTime Screen Recording (built-in Mac)
- Screen Recorder Utility (PC)
- Active Presenter (PC)
- EZvid (PC)
- Screenr (web-based, all platforms)
LICEcap (Free, MAC and PC)
LICEcap is a free screencasting tool that deserves a bit of special attention. Unlike the tools listed above, LICEcap doesn't record video. Instead, it creates an animated GIF from what it records via the transparent window that appears on your screen.
This can make the ExplainerGIF process very quick. The problem is lack of control. It makes an animated GIF from everything it records and doesn't provide a way to edit the clip after it is captured. You may end up with a GIF that includes unwanted content.
Paid Screencasting Tools
The paid tools, on the other hand, come with many more features and options. The best-in-class options are screencasting tools AND full video editors. These tools allow for things like:
- Timeline editing. Trim, copy-and-paste, replace clips.
- Speed up or slow down clips.
- Add highlights and annotations after recording is finished.
- Export video files in a variety of format and sizes.
- Export directly to services like YouTube
PAID examples include: (I am not affiliated with any products listed here.)
- Screenflow - Mac only ($99)
- Camtasia Studio for PC ($299)
- Camtasia for Mac ($99)
The products listed above offer a free trial and I encourage you to experiment. I've used Camtasia and Screenflow and consider them almost interchangeable. I will be using Camtasia for Mac to record my screen in rest of this guide.
Bottom Line: To make ExplainerGIFs, you need some way to capture an animation on your screen and potentially edit the footage to make it look great.
Let's Record a Video
No matter what tool you choose, the process is similar. It usually involves these steps:
- Open PowerPoint with your animation visible
- Open your screencasting tool
- Click "Record" on your screencasting tool
- Play your animation in PowerPoint
- Stop the recording in your screencasting tool (this will bring up the tool's timeline)
- Edit the video to remove unwanted sections
- Save the video
- Export as an MP4 video file
This process is easy to follow in the video below. The tools I use in this video are PowerPoint for Mac 2011 and Camtasia for screencasting. But these specific tools aren't required. Any tools that can play an animation on your screen and capture it as a video may work.
So that's the big idea. Here, we used a very simple example of a Venn Diagram, but the process is the same for any kind of animation.
Consider This
We've now created a video file of an animation. You could upload it to YouTube or Facebook or save it to your phone or tablet. The problem is, videos are not universal. They need special players and settings to work correctly. Further, a simple Venn Diagram doesn't require a whole video.
That's why animated GIFs are powerful. They are universal. They play everywhere. They are perfect for short, visual ideas, like diagrams and processes.
This guide is brought to you by the Explainer Academy
Develop powerful explanation skills and learn to create Common Craft Style videos via online courses. Learn more.
Practice Time
Prepare PowerPoint Animations
- Open the PowerPoint file you used previously, or create a similar slide with a few shapes and animations
- Play the animations and make any needed edits
- Work on timing and flow
Recording On-screen Animations
- Open your screencasting tool and click "record"
- With the screencasting tool recording, play your animations in PowerPoint.
- When the animations finish, tell the screencasting tool to stop recording. If you are using a fully-featured tool, this will bring up the editing tool.
Edit Video Footage
- If it doesn't appear automatically, drag the video file to the timeline where you can watch and edit the footage.
- Watch the video and consider what parts you'd like to keep.
- Use the editing tools to remove the sections you don't want.
- If possible, speed up a clip to animate faster.
- If possible, show down a clip.
- If possible, use the tool to add text to the video.
Save and Export the File
- When you're finished, save the file. This is saving the edits.
- To create a video file, Export the video and save the exported video to your computer.
You have now recorded, edited and created a new video! Yay!
Next, we'll look at converting that video into an animated GIF that will play anywhere.
Skill: Converting Your Videos to Animated GIFs
We are getting very close. You've created an animated video clip - now we just need to convert it to an animated GIF.
Previously we compared animated GIFs to flipbooks, where each image only shows for a fraction of a second. By starting with a video clip, we're essentially working backwards. We're cutting up film into individual flipbook images.
The Problem:
A few seconds of video footage can quickly become dozens of individual images that can increase file size quickly. If you don't manage them, your animated GIF will be too large to use online because it will take too long to load.
Managing File Size
For animated GIFs to work on a web page or email newsletter, they need have a small file size, hopefully under 250kbs. Thankfully, there are multiple ways to manage the file size of your animated GIF and understanding those options will help you find the right size for your clip.
- Image Dimensions - This issue is the same as a single digital photograph. The bigger the image in terms of dimensions, the bigger the file size. This is often measured in pixels. A photo that 1200 X 800 has a much larger file size than a photo that is 600 X 400 because it has a lot more pixels. The same is true with animated GIFs. You can decrease the file size by resizing the images in the GIF to be smaller.
- Duration - It's simple. The longer your animated GIF is, the more images it will require. For this reason, most animated GIFs are under 30 seconds in duration.
- Color - In a digital image, color increases file size. Animated GIFs can use up to 256 colors. The more colors that are included, the bigger the file size. To reduce file size, reduce the number of colors in the images. You can also consider using black-and-white or grayscale color schemes. This can have a significant impact on file size.
- Video Source - When exporting a video clip as we did in the last section, you'll see options for the quality of the exported video file. These options can be used to reduce file size. For example, you can export the video at a lower quality setting, which reduces file size. You may also be able to reduce the dimensions of the video to be smaller.
- Frame Rate - Again, think about the flipbook analogy. With an actual flipbook, it may be possible to count how many images flip-by in one second. Maybe 5? 10? This is the frame rate - how many images display in a second. As you can imagine, the higher the frame rate, the bigger the file size. Normal video is often 30 frames per second. With simple animated GIFs like the Venn Diagram, you can go as low as 5 or 10 frames per second. This can significantly reduce file size.
Every Tool is Different
There are dozens of tools that will convert a video clip into an animated GIF and each one has its own set of features and capabilities. Often what differentiates the tools is the operating system on which they were designed to work. I provide multiple options below, but I encourage you to experiment.
Creating Animated GIFs from Video Clips
Camtasia Export to GIF
In the last section, we used Camtasia to create a video by recording a screencast of a PowerPoint animation. This process works on other screencasting tools, but Camtasia takes it a step further. Using the Advanced Export Options, you can create an animated GIF right from Camtasia. The 35 second screencast video below shows you how.
Other GIF Creation Options
Below you'll find a number of tools that can be used to convert video clips that are saved on your computer into animated GIFs. I encourage you to experiment. Each app offers its own set of features and limitations.
Best in Class: GIF Brewery ($5US, Mac Only)
GIFBrewery is the best tool I've tested. It provides a great set of features and an "automatic" mode that produces beautiful GIFs at a great file size. I'll talk more about GIF Brewery below.
Free Video-to-GIF Converters (for videos saved on your computer)
- Free Video GIF Converter (PC) Stand-alone app.
- EZGIF (Online - All Platforms) Few limitations, good control options
- ImgFlip (Online - All Platforms) Limited features in free version - "Pro" upgrade available
- Make A GIF (Online - All Platforms) Limited to 10 second duration
- GFYCat (Online - All Platforms) Limited to 15 Second Duration
In most cases, you'll upload the video and make selections about the GIF it will create. As I discussed previously, these selections often focus on color, duration, frame rate, dimensions, etc. To get the GIF right, you'll likely need to experiment using the settings in the converter tool.
Testing Your GIFs
When you experiment with making new animated GIFs, you'll need an easy way to see how they look. Often, it's not useful to click on the file saved on your computer because the GIF files consist of multiple images. The best way to test a GIF is to drag it directly into your browser. The GIF will play immediately and look just like it will in any other situation. See the simple drag-and-drop example below:
Practice Time
Up to this point, you've created shapes in PowerPoint and animated them. You've also recorded those animations in a screencast and saved the video. Now it's time to convert that video into an animated GIF.
- Open your GIF converter tool
- Use the tool to open the video file you exported
- Change the settings in the GIF converter to try to minimize file size
- Convert the video into a GIF and save it. Notice the file size.
- Drag the new GIF onto a browser window and watch it play. Does it play as expected?
- If possible, change the settings in the converter. Use fewer colors or a smaller frame rate. Save the GIF and watch it.
- Repeat until the GIF works as you'd like.
Next we'll take a closer look at optimizing our GIFs to get the most out of them.
Skill: Optimizing Your ExplainerGIFs
You've now made your own ExplainerGIFs! YAY!
In order to make ExplainerGIFs the best they can be, we'll need to optimize them. This means looking closely at the settings that make them work.
Below I will take you through an experiment that uses the settings of GIF Brewery to create the perfect ExplainerGIF.
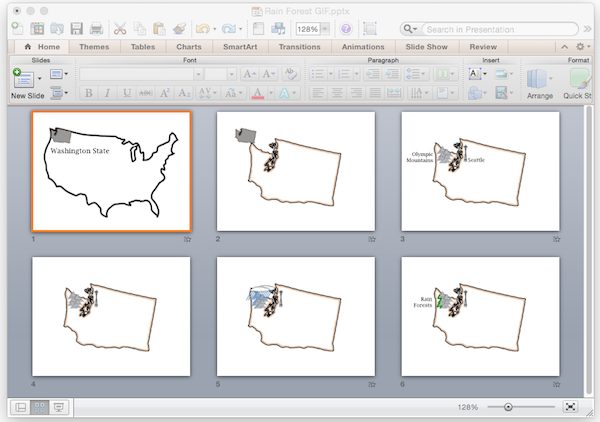
Our Focus - Rain Forests and Rain Shadows
I'm a bit of a weather geek. I love learning about the weather, and living in Seattle, there is plenty of weather to watch.
Recently, we went out to the Washington State coast, the home of temperate rainforests that stretch up into British Columbia. These forests get a LOT of rain and I set out to understand why. After learning the basics, I realized that an ExplainerGIF could be the easiest way to capture and share what I learned quickly. So, I created one:
A few things to notice about the ExplainerGIF above:
- It's 15 seconds long
- It relates an idea in an understandable way
- File size = 136kbs
In the world of ExplainerGIFs, that's pretty good. Below I will take you through all the decisions that went into making this GIF work.
PowerPoint
The animation uses Common Craft Cut-outs, which are usually simple and low color images. I started by laying out all the images on PowerPoint slides and experimenting with animations. I used six total slides. It's helpful to use multiple slides so that the animation settings don't get too complicated. In this example, five out of six slides included the state outline as the base image.
Screenflow
For this ExplainerGIF, I used Screenflow. Once I got the animation timing down in PowerPoint, I asked Screenflow to record everything on my screen. Then I displayed the PowerPoint slides full screen. This created a video of the animation.
Once the recording was done, it was time to edit the footage to make it as short as possible.
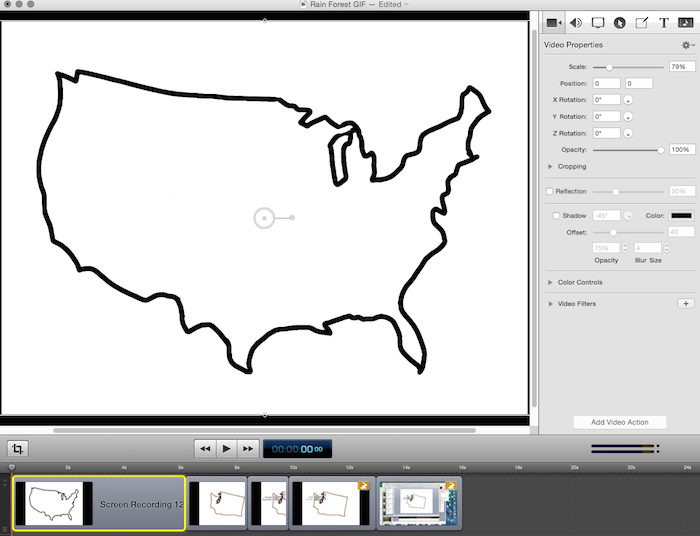
Above, you can see that I split the footage into five sections and sped up the last two clips (notice the rabbit icons). Once the footage was playing well in Screenflow, I saved the file. Then I exported the footage to create a file that could be converted into a GIF.
Here are the export settings I used in Screenflow:

Notice the Preset is "Web - Low" and that I've scaled the video down to 30% of it's original size. These are important for reducing the size of the file that will create the ExplainerGIF. Once the video file is exported and saved on my computer, I open GIF Brewery.
GIF Brewery
To start this process, I open the exported video inside GIF Brewery. The video shows up inside the GIF Brewery window. From here, there are a number of controls that enable you to manage the GIF it creates. Keep in mind that many of the options discussed below are also available in other tools.
The simplest options are on the main menu. They are Crop and Resize. These options can help you reduce the dimensions of the GIF and make it smaller.

Next we'll look at fine-tuning options that can make a big difference in file size. These options are available in "GIF Properties". Below is a screenshot of the options I used to create the GIF above. The biggest changes are outlined in Orange.

Frame Rate and Automatic Settings
I have found that the best way to use GIF Brewery is through the "Automatically Calculate Count and Delay" option. When this option is selected, you can change the frame rate. For ExplainerGIFs, you can reduce the frame rate (and file size) significantly. The default is 30 frames per second (fps), but I recommend between five and ten fps. If you use too few frames, this GIF will look choppy.
Color
Color is another change that impacts file size. As we've discussed, GIFs can handle up to 256 colors. But we don't need that many for ExplainerGIFs. The GIF Brewery default is 48 colors, but I've reduced it to 24 and that made the file smaller. I tried 16 colors, but that change interfered with the color of the rain (blue) and rainforest (green). If your GIF is only a couple of colors, you may be able to use grayscale or black-and-white options.
To Test, Save the GIF
Simply click "Create GIF" to see the impact your changes. There are a few things to look for...

File Size: GIF Brewery will immediately display the file size of the GIF. Your goal is for the GIF to be under 250kbs. This is simply a rule of thumb - the file size really depends on how you plan to use the GIF.
Playback: Are the animations stuttering and jerky? If so, there are too few frames per second.
Color: Are any colors off? If so, you may need to increase the number of colors available.
Once you have everything set, you can simply save the GIF on your computer and it's ready to share.
This guide is brought to you by the Explainer Academy
Develop powerful explanation skills and learn to create Common Craft Style videos via online courses. Learn more.
Next we'll finish up with some thoughts on using ExplainerGIFs in the real world.
Sharing ExplainerGIFs
You now have this amazing new power to create ExplainerGIFs. Now what?
My guess is that you work in a situation where you need to communicate ideas quickly and easily. Maybe you are...
- A teacher or instructor that's working to share ideas or processes with students
- An entrepreneur hoping to get people to see an idea more clearly
- A consultant who needs better ways to communicate complex ideas
- A marketer looking for compelling ways to reach potential customers
- A trainer or media coach who is interested in adding a new skill to their toolbox.
- A writer or journalist who needs better ways to communicate ideas.
To understand the utility of an ExplainerGIF, we can look at digital images. Animated GIFs work almost anywhere a digital image can be displayed. They work:
- In email newsletters
- On websites
- In presentations
- On blogging platforms
- On Twitter
- On Reddit
- On photo sharing websites
Of course, there is one GLARING exception: Facebook. The social network does not yet allow animated GIFs. Boo.
What's Your Strategy?
Like anything else, it's not having an animated GIF that matters; it's what you do with it. Here are a few notes to get you thinking...
- Substitute for Video - Are you currently using video in your work? Are there short videos on your website or lessons? Could they be GIFs instead?
- Substitute for Images - That diagram you're using, well, it's kind of boring. If you made an ExplainerGIF would it be more compelling?
- Substitute for Infographic - Infographics are cool. But you know what's really cool? Animated infographics.
- A fun take on a boring subject.
- Teaser for Other Content - GIFs can serve as great teasers for longer form content. For example, we're constantly publishing new videos at Common Craft that are about 3 minutes long. In the process of publishing a new video, we use an image as the "cover" or "poster" for the video. Once I learned to make ExplainerGIFs, I started to use GIFs instead. These are 20 second experiences that serve as teasers for the new video. Here's an example:
ExplainerGIFs like the one above have become standards in blog posts and in our email newsletters. They offer a fundamentally different experience.
GIF Sharing Services
Like YouTube, there are a number of GIF sharing services that can help your GIF get more attention. I've listed a few below:
A Case Study - Content Marketing
At Common Craft we are big soccer fans and in particular, supporters of the Seattle Sounders FC. Over years of going to matches, you get used to the stadium experience. But if you imagine going for the first time, it's kind of confusing. Who are the people singing all the songs? Do I need a rain jacket for my seats? How many people come to a match?
With these questions in mind, I set out to create an ExplainerGIF about the experience (it's below). The opportunity we saw, aside from helping new fans, was content marketing. Here's the idea...
We branded the GIF with our logo and twitter handle and encouraged people to share it. We created a page on commoncraft.com to serve as the home of the GIF. Then, we posted the link to Reddit and Twitter. We also uploaded the GIF to imgur. In the first 24 hours, the new page was viewed over 1000 times. An ExplainerGIF gave us a way to create something compelling and worthy of attention.
Here's the ExplainerGIF:

A Final Note
I am convinced that we are in the verge of (or living in) a second golden age of animated GIFs. Today the web is full of cat GIFs and GIFs from TV shows. Here's the thing: we can do better. The animated GIF is a powerful and flexible tool. It can solve problems, it can educate, it can inform in a remarkably effective way.
My hope is that you'll use the information in this guide for useful, productive purposes... and that doesn't have to mean boring. Have fun, be creative, make something!
If you have any feedback, ideas or concerns, don't hesitate to contact us. We'd love to see you on Twitter or Facebook, too.
Lee and Sachi LeFever, Common Craft, Seattle, WA, USA

About the Explainer Academy
 We've created a set of online, self-paced courses called the Explainer Academy.
It's a website devoted to helping professionals develop powerful explanation skills and learn to create do-it-yourself Common Craft Style videos using inexpensive and easy-to-use tools.
The courses are:
- The Explanation Master Course - A comprehensive look at the theories, skills and strategies that go into powerful explanations.
- The DIY Media Maker Course - A step-by-step guide to every part of the DIY video creation process from script to video editing.
Our goal is to build on the success of our book, The Art of Explanation and provide in-depth resources that teach explanation skills and strategies. The Explainer Academy, like everything at Common Craft, is a project of Lee and Sachi LeFever.